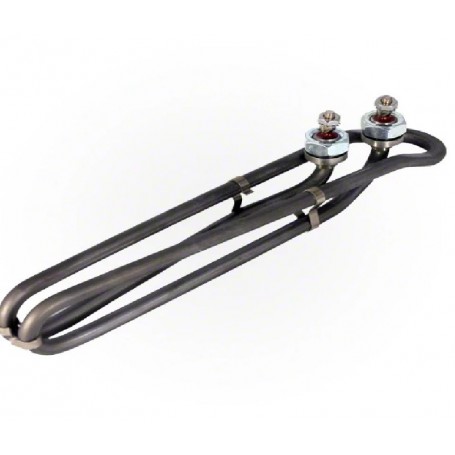
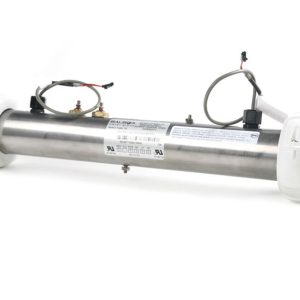
3.0KW Official Balboa Heater Element 800inc
£53.35 Inc VAT
40 in stock
3.0KW Official Balboa Heater Element 800inc: The Heart of Your Hot Tub
Introduction
As an experienced hot tub enthusiast and supplier, I’m excited to introduce you to the 3.0KW Official Balboa Heater Element 800inc. This high-quality component is essential for maintaining the perfect temperature in your hot tub, ensuring you can enjoy a relaxing soak whenever you desire.
Why Choose the Balboa 800inc Heater Element?
The Balboa 800inc heater element is a premium product designed for reliability and efficiency. Made with Incoloy, a high-performance nickel-chromium-based alloy, this element offers superior corrosion resistance and longevity, even in the demanding environment of a hot tub.
Key Features
- Official Balboa Product: Guaranteed compatibility and performance
- Incoloy Construction: Superior durability and corrosion resistance
- Optimal Design: Specially engineered for Balboa heater tubes
- High Power Output: 3.0KW for rapid and efficient heating
- Universal Voltage: Compatible with 230V systems
Technical Specifications
To help you understand the capabilities of this heater element, I’ve compiled a detailed specifications table:
| Specification | Detail |
|---|---|
| Type | Official Balboa 800 Incoloy heater element |
| Manufacturer | Balboa |
| Power | 3.0 KW |
| Voltage | 230V |
| Frequency | 50 Hz |
| Amperage | 11.5 – 12.0 Amps |
| Length | 270 mm |
| Height | 60 mm |
| Distance Between Terminals | 33 mm |
| Connections | 19mm nut x2 to secure element in place |
Documentation
Compatibility and Installation
This heater element is designed to work seamlessly with Balboa heater tubes. Its precise engineering ensures it maintains the correct distance from the M7 sensors, crucial for accurate temperature control and safe operation.
Installation is straightforward, with two 19mm nuts securing the element firmly in place. However, it’s important to note that proper installation is key to the longevity and performance of the element.
Important Usage Note
To ensure the longevity of your new heater element, always make sure the heater tube is primed with water before switching on the unit. This simple step can prevent potential damage or burnout of the element.
Why Upgrade Your Heater Element?
- Improved Efficiency: A new, high-quality element can heat your hot tub faster and more efficiently.
- Consistent Temperature: Enjoy a perfectly heated hot tub every time you use it.
- Energy Savings: An efficient heater element can lead to lower energy bills.
- Peace of Mind: With a reliable Balboa element, you can relax without worrying about unexpected breakdowns.
Conclusion
The 3.0KW Official Balboa Heater Element 800inc is a top-tier component that can significantly enhance your hot tub experience. Its robust construction, efficient performance, and compatibility with Balboa systems make it an excellent choice for both replacements and upgrades.
Invest in your relaxation and comfort with this high-quality heater element. Your hot tub – and your stress levels – will thank you!
Hot Tub Heater Element Replacement; What are the symptoms a hot tub heater element needs replacing?
There are several symptoms that may indicate a hot tub heater element needs replacing. Here are some common signs to watch out for:
Inadequate Heating:
If you notice that your hot tub water is not reaching the desired temperature or is taking much longer to heat up than usual, it could be a sign of a failing heater element. The element may not be generating enough heat or may be malfunctioning, resulting in insufficient heating of the water.
Fluctuating Temperature:
If the hot tub water temperature fluctuates inconsistently, going from hot to cold or vice versa, it could indicate a problem with the heater element. It may be struggling to maintain a steady temperature due to a damaged or faulty element.
No Heating: If your hot tub water remains cold even when the heater is running, it’s likely that the heater element has failed completely. This can occur due to a burnt-out element or a break in the electrical connection.
Tripping Breakers:
If the hot tub’s electrical breaker frequently trips or the GFCI (Ground Fault Circuit Interrupter) is constantly triggered, it could be a sign of a faulty heater element. Electrical issues within the element can cause short circuits or excessive power draw, leading to breaker trips.
Visible Damage:
Inspect the heater element visually for any visible signs of damage, such as cracks, breaks, or corrosion. Physical damage to the element can affect its performance and reliability.
It’s important to note that these symptoms can also be indicative of other hot tub issues, such as problems with the thermostat or the control board. Therefore, it’s recommended to consult a hot tub professional or refer to the manufacturer’s troubleshooting guide to accurately diagnose the cause of the problem.
If you suspect that the heater element is the culprit behind the issues you’re experiencing, it may be necessary to replace the element. Consult the manufacturer’s guidelines and specifications to ensure you select the correct replacement element for your hot tub model.
At Parts4Tubs.com, we offer a wide range of hot tub heater elements, including compatible options for various hot tub brands and models. Replacing a faulty heater element will help restore proper heating performance and ensure an enjoyable hot tub experience.
Hot Tub Heater Element Replacement; How do I replace a hot tub heater element?
Replacing a hot tub heater element is a task that requires careful attention and adherence to safety guidelines. Here is a step-by-step guide to help you through the process:
Preparation:
- Turn Off Power: Before starting any work, ensure that the power to the hot tub is turned off at the circuit breaker. This step is crucial for your safety and to prevent electrical shocks.
- Gather Tools and Materials: Collect the necessary tools and materials for the replacement, including a compatible replacement heater element, wrenches, screwdrivers, multimeter, and Teflon tape (if required).
Removal of Old Heater Element:
- Drain the Hot Tub: Completely drain the hot tub to a level below the heater element. Follow the manufacturer’s instructions or consult your hot tub’s manual for the proper draining procedure.
- Access the Heater Assembly: Remove any access panels or covers to reach the heater assembly. These panels are typically located near the equipment area of the hot tub.
- Disconnect Electrical Connections: Carefully disconnect the electrical connections from the old heater element. This includes disconnecting the power supply wires and any other wiring connected to the element. Take note of the wire colors and their corresponding terminals for reconnection.
- Remove the Mounting Hardware: Loosen and remove any mounting brackets, clamps, or screws holding the heater element in place. Keep track of the hardware for reinstallation.
- Extract the Old Heater Element: Gently slide or wiggle the old heater element out of its housing. Be cautious not to damage surrounding components or plumbing.
Installation of New Heater Element:
- Apply Teflon Tape (If Required): If your replacement heater element requires Teflon tape, wrap the threaded portion of the element with a few layers of tape in a clockwise direction. This will help create a watertight seal when installed.
- Insert the New Heater Element: Carefully insert the new heater element into the housing, aligning it with the mounting holes or brackets.
- Secure the Mounting Hardware: Reattach the mounting brackets, clamps, or screws to secure the new heater element in place. Ensure that it is firmly positioned and properly aligned.
- Reconnect Electrical Connections: Reconnect the electrical connections to the new heater element. Follow the color-coded wires and their corresponding terminals. Double-check the connections to ensure they are tight and secure.
- Test the Heater Element: Before proceeding, ensure that all electrical connections are properly secured. Turn on the power supply and test the heater element using a multimeter to verify voltage and resistance readings (if applicable). Refer to the manufacturer’s instructions for specific testing procedures.
- Close and Seal: Once the heater element is installed and tested, close the access panels or covers and ensure they are securely fastened.
- Refill the Hot Tub: Refill the hot tub with water, following the manufacturer’s instructions or consult your hot tub’s manual for the proper filling procedure.
- Restore Power and Test: Turn on the power supply at the circuit breaker and power up the hot tub. Monitor the heater element to ensure it is functioning correctly and producing heat.
| Part# | 58267 |
|---|
Related products
Control Boxes, Spa Packs & Topside Controls
Control Boxes, Spa Packs & Topside Controls
Control Boxes, Spa Packs & Topside Controls
Control Boxes, Spa Packs & Topside Controls
Control Boxes, Spa Packs & Topside Controls
Balboa VL200 Topside Control Panel (3 Button) – Compatible with GS500 & GS501 Series
Control Boxes, Spa Packs & Topside Controls
Control Boxes, Spa Packs & Topside Controls

