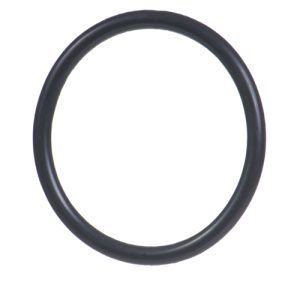
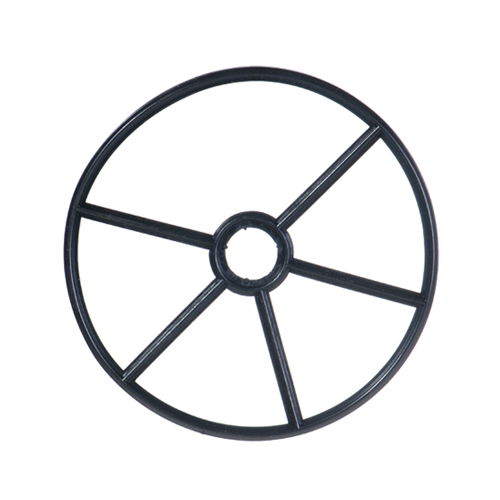
1.5″ Triton Multiport Spider Gasket
£47.66 Inc VAT
Out of stock
Want to be notified when this product is back in stock?
1.5″ Triton Multiport Spider Gasket
Essential Seal for Triton Multiport Valve Performance
When your Triton multiport valve begins leaking, loses pressure, or fails to seal properly between operating positions, the spider gasket is often the culprit requiring replacement. This 1.5″ Triton Multiport Spider Gasket is the critical sealing component that sits between the valve body and the multiport top assembly, creating watertight seals across all valve positions—Filter, Backwash, Rinse, Waste, Recirculate, and Closed. As a precision-manufactured replacement part specifically designed for 1.5″ Triton multiport valves, this spider gasket restores your filtration system to proper operation, eliminating leaks and ensuring efficient pool water circulation.
What is a Spider Gasket?
As a retailer of hot tub spare parts, I understand that many pool and spa owners are unfamiliar with spider gaskets until one fails, so let me explain this critical component. The spider gasket (also called a key gasket or star gasket due to its distinctive star-like shape with multiple radiating “legs”) is a flat, flexible seal that sits horizontally inside your multiport valve beneath the rotating diverter mechanism.
This gasket creates individual seals around each of the ports in the valve body—the ports that direct water to different functions depending on handle position. When you rotate the multiport handle to select Filter, Backwash, or any other position, the diverter assembly presses down against the spider gasket, and the gasket’s raised ribs seal around the appropriate ports while blocking others. This precise sealing is what allows the valve to direct water flow exactly where it needs to go for each function without mixing flows or allowing leaks.
Understanding Triton Multiport Valves
The Triton Valve System
Triton multiport valves are widely used in pool and spa filtration systems:
Popular Brand: Triton represents one of the established brands in pool equipment, known for reliable multiport valves used across residential and light commercial applications.
1.5″ Size: The 1.5″ designation refers to the pipe connection size—this valve accommodates 1.5″ plumbing connections common in many residential pool systems.
Multiple Positions: Triton multiport valves typically offer 6-7 positions:
- Filter: Normal filtration operation
- Backwash: Reverses flow to clean filter media
- Rinse: Flushes filter after backwashing
- Waste: Drains water without passing through filter
- Recirculate: Circulates water bypassing filter
- Closed: Shuts off flow completely
- Winter (some models): Winterization position
Critical Seal: The spider gasket is the heart of this system—without it properly sealing, the valve cannot function correctly.
Signs of Spider Gasket Failure
Spider gaskets wear out over time, and failure symptoms include:
Leaking from Waste/Backwash Line: Water trickling from backwash line even in Filter mode indicates gasket no longer seals properly.
Reduced Water Flow: Worn gasket allows water to bypass intended path, reducing filtration efficiency.
Loss of Suction/Pressure: Poor sealing creates pressure loss affecting entire system performance.
Difficulty Turning Handle: Worn, distorted, or improperly seated gasket can make handle hard to rotate.
Visible Water in Sight Glass: Water appearing in valve sight glass when it shouldn’t indicates internal leaking past gasket.
Milky or Cloudy Water in Pool: If DE or sand filter media passes into pool, gasket failure may be allowing filter bypass.
Multiple Positions Behaving Similarly: If Backwash and Filter seem the same, gasket isn’t properly directing flow.
Key Features and Benefits
Precision-Engineered Design
Manufactured specifically for Triton multiport valves:
Exact Fit: Dimensions and port spacing precisely match Triton valve body ensuring proper sealing at all positions.
Correct Profile: Raised rib height and configuration engineered to create optimal seal compression without over-stressing gasket.
Proper Star Pattern: Number and positioning of “legs” match Triton valve port layout exactly.
Material Compatibility: Formulated to work with Triton valve materials and typical pool water chemistry.
Durable Material Construction
Engineered for demanding pool environment:
Chemical Resistance: Withstands continuous exposure to chlorine, bromine, pH adjusters, and other pool chemicals without degrading.
Temperature Stability: Maintains sealing properties across typical pool water temperature ranges.
Compression Set Resistance: Resists permanent deformation from constant compression, maintaining sealing effectiveness.
Flexibility: Remains flexible enough to seal effectively while being rigid enough to maintain shape under pressure.
UV Resistance: Resists degradation from any UV exposure during installation or maintenance.
Compact Dimensions
The gasket’s physical specifications:
Weight: 0.38 kilograms—substantial enough for quality construction while manageable for installation.
Diameter: 0.17 meters (170mm) overall dimension appropriate for 1.5″ valve size.
Thickness: 0.03 meters (30mm) providing adequate material for compression sealing.
Volume: 0.001 cubic meters—compact enough for easy storage and handling.
Simple Replacement Process
Designed for straightforward replacement:
DIY-Friendly: Homeowners with basic tools and mechanical aptitude can replace spider gaskets.
Clear Installation: Proper orientation obvious from gasket design—can’t install significantly wrong.
Minimal Tools: Requires only basic hand tools (screwdrivers, wrenches) for valve disassembly.
Quick Turnaround: Entire replacement process typically 30-60 minutes for first-time DIYers, faster for experienced technicians.
Applications and Compatibility
Triton 1.5″ Multiport Valves
Primary application for this gasket:
Top-Mount Configuration: Triton valves mounted on top of sand or DE filters.
Side-Mount Configuration: Triton valves mounted beside filters with appropriate plumbing.
Residential Pool Systems: Typical home pool filtration systems with 1.5″ plumbing.
Spa and Hot Tub Systems: Larger spa or hot tub installations using Triton multiport valves for filtration control.
Verification Before Purchase
Critical: Verify compatibility before ordering:
- Confirm Brand: Ensure your valve is actually Triton brand—spider gaskets are brand and model-specific.
- Verify Size: Confirm valve has 1.5″ pipe connections (measure or check original equipment specifications).
- Check Valve Model: If possible, note valve model number for absolute compatibility confirmation.
- Compare Gasket Pattern: If removing old gasket, compare star pattern, number of legs, and dimensions to product description.
- Measure Existing Gasket: Measure old gasket diameter and compare to specifications to ensure proper match.
Replacement Process
When to Replace
Spider gasket replacement is needed when:
Visible Wear: Old gasket shows cracks, tears, permanent compression, or obvious deterioration.
Performance Issues: Valve exhibits symptoms described earlier (leaking, poor flow, mixing positions).
Age: Even without obvious failure, gaskets should be replaced every 3-5 years as preventive maintenance.
Filter Maintenance: Often replaced during major filter maintenance or rebuild for peace of mind.
Troubleshooting: When diagnosing multiport valve problems, gasket inspection and often replacement is standard procedure.
Tools and Materials Required
Gather these before starting:
Tools:
- Screwdrivers (Phillips and/or flathead depending on valve)
- Wrenches or pliers for any securing nuts/bolts
- Clean rags or paper towels
- Small brush for cleaning
Materials:
- New spider gasket (this product)
- Silicone-based lubricant (approved for pool use)
- Optional: Replacement o-rings for valve cover if needed
Safety:
- Safety glasses (protection from spring-loaded components)
- Work gloves if desired
Step-by-Step Replacement Procedure
1. System Shutdown and Preparation:
- Turn off pool pump completely
- Close valves isolating multiport valve if possible
- Relieve any pressure in system
- Ensure stable, safe working conditions
2. Remove Multiport Handle and Cover:
- Remove handle securing screw and lift off handle
- Remove screws or clamps securing valve top cover
- Carefully lift cover assembly—note any internal springs or components
- Set aside in clean, safe location
3. Remove Diverter Assembly:
- Lift out diverter mechanism (the rotating part)
- Note orientation and position for reassembly
- Inspect diverter for wear or damage while accessible
- Clean any debris or buildup from diverter
4. Remove Old Spider Gasket:
- Carefully peel or lift old gasket from valve body
- If stuck, gently work around edges to release
- Remove all pieces if gasket has broken or deteriorated
- Clean gasket seating area thoroughly
5. Clean Valve Body:
- Remove all old gasket material, debris, or buildup from seating surface
- Clean each port opening ensuring no obstructions
- Wipe surfaces clean and dry
- Inspect for any cracks, damage, or wear requiring attention
6. Install New Spider Gasket:
- Position new gasket in valve body with legs aligned to ports
- Ensure gasket sits flat and fully seated
- Verify all ports align correctly with gasket openings
- Apply thin coat of silicone lubricant to gasket ribs (helps create seal and eases diverter movement)
7. Reinstall Diverter Assembly:
- Carefully lower diverter back into position
- Ensure proper orientation matching original position
- Verify diverter sits correctly on gasket without binding
- Rotate gently to check smooth operation
8. Reinstall Valve Cover:
- Check cover o-ring condition (replace if worn)
- Position cover carefully aligning with mounting holes
- Install screws or clamps evenly, tightening gradually in star pattern
- Don’t overtighten—snug but not crushing
9. Reinstall Handle:
- Position handle on valve stem in proper orientation
- Rotate through positions verifying proper indexing
- Install and tighten handle securing screw
- Verify handle moves smoothly through all positions
10. System Testing:
- Open any closed isolation valves
- Start pump and observe for leaks
- Cycle through all valve positions verifying proper operation
- Check backwash line for unwanted flow in Filter position
- Monitor pressure gauge for proper reading
- Watch for leaks around valve cover
Installation Tips for Success
Proper Orientation: Some spider gaskets have specific orientation—verify before final installation that ports align correctly.
Lubrication: Light coat of pool-approved silicone lubricant on gasket ribs helps seal and allows smooth diverter movement—don’t use petroleum-based products.
Even Tightening: When reinstalling cover, tighten screws gradually in star pattern to ensure even compression and gasket seating.
Handle Indexing: Ensure handle indexes properly to positions after reassembly—may require adjusting handle position on stem.
Leak Testing: After reassembly, run system and watch carefully for any leaks before considering job complete.
Maintenance and Longevity
Expected Lifespan
Typical Service Life: Spider gaskets typically last 3-5 years depending on:
- Water chemistry maintenance (balanced chemistry extends gasket life)
- Usage patterns (frequent valve operation wears gasket faster)
- Water temperature (hot spa water ages gaskets faster than cool pool water)
- Chemical exposure (high chlorine or aggressive chemistry accelerates degradation)
- Quality of original installation
Extending Gasket Life
Proper system care helps maximize gasket longevity:
Balanced Water Chemistry: Maintain proper pH, chlorine, and alkalinity—extremes accelerate gasket deterioration.
Gentle Valve Operation: Rotate handle smoothly without forcing—aggressive operation damages gasket.
Regular Valve Cycling: Occasional cycling through positions keeps gasket flexible and prevents permanent set in one position.
Proper Lubrication: If valve becomes stiff, internal lubrication during maintenance helps reduce gasket wear.
Avoid Extended Backwash: Don’t leave valve in Backwash or Waste positions longer than necessary—these positions create most wear.
Preventive Maintenance
Regular Inspection: During filter maintenance, quick visual inspection of gasket condition if valve opened.
Scheduled Replacement: Consider replacing gasket every 3-5 years as preventive maintenance even without obvious failure.
System Monitoring: Watch for early warning signs of gasket wear (slight leaks, reduced flow) and address promptly.
Troubleshooting After Replacement
If Problems Persist After Gasket Replacement
Continued Leaking:
- Verify gasket properly seated and oriented correctly
- Check valve cover o-ring condition and replacement if needed
- Inspect valve body for cracks or damage
- Ensure cover screws tightened evenly and adequately
Poor Sealing Between Positions:
- Confirm correct gasket for your specific valve model
- Verify diverter assembly properly installed and not damaged
- Check that gasket ribs not damaged during installation
- Ensure adequate lubrication for proper seal compression
Difficult Handle Operation:
- May need additional lubrication on gasket
- Verify cover not over-tightened binding diverter
- Check for debris or damage preventing smooth rotation
- Confirm diverter properly seated and aligned
No Improvement in Symptoms:
- Problem may not be spider gasket—could be other valve components
- Valve body itself may be cracked or damaged
- Diverter assembly may be worn or damaged
- Consider professional evaluation if problems continue
Technical Specifications
| Specification | Detail |
|---|---|
| Product Type | Spider Gasket / Key Gasket |
| Brand Compatibility | Triton |
| Valve Size | 1.5″ (pipe connection size) |
| Valve Type | Multiport (top-mount or side-mount) |
| Weight | 0.38 Kilograms |
| Diameter | 0.17 Meters (170mm) |
| Thickness | 0.03 Meters (30mm) |
| Volume | 0.001 Cubic Meters |
| Material | Chemical-resistant elastomer (pool-grade) |
| Temperature Range | Suitable for typical pool/spa temperatures |
| Chemical Resistance | Chlorine, bromine, pH adjusters, pool chemicals |
| Expected Lifespan | 3-5 years typical (varies by conditions) |
| Installation | Replacement requires valve disassembly |
| Skill Level | DIY-capable with basic mechanical aptitude |
| Tools Required | Basic hand tools (screwdrivers, wrenches) |
| Category | Spares |
| Stock Status | 2 in stock |
Why Replace Your Spider Gasket?
Regular spider gasket replacement ensures:
- Optimal valve performance with proper flow direction and pressure
- Elimination of internal leaks wasting water and reducing efficiency
- Proper filtration ensuring water passes through filter as intended
- Extended equipment life reducing wear on other system components
- Energy efficiency maintaining proper flow reduces pump strain
- System reliability preventing failures during swimming season
- Cost savings vs. complete valve replacement or professional service calls
The spider gasket represents a small investment that has outsized impact on overall filtration system performance. When it fails, your entire system suffers—but replacement is straightforward and restores full functionality.
Note: Verify compatibility with your specific Triton multiport valve before ordering. While this gasket is designed for 1.5″ Triton valves, variations exist among models and years. If uncertain about compatibility or installation procedure, consult your valve’s documentation or consider professional assistance. Proper installation is essential for optimal performance—follow procedures carefully and don’t rush the process.
| Weight | 0.38 Kilograms |
|---|---|
| Length | 0.17 Meters |
| Width | 0.17 Meters |
| Height | 0.03 Meters |
| Volume | 0.001 CubicMeters |
| Supplier | GoldenC |
Related products
Spares